Education
Animal Crossing New Horizons Secret Area & Waterfall Entrance Building Tips
Animal Crossing New Horizons
We are taking a look at the best way to create a secret area using a waterfall entrance on your new horizons island.
As you may or may not have heard there is a tiny little glitch in New Horizons that allows you to jump through waterfalls. This is a great opportunity to recreate something straight out of the movies where you can jump through a waterfall to a secret or hidden area. Usually, we wouldn’t talk about glitches but this one doesn’t impact the economy that surrounds the game and certainly doesn’t lead to obtaining any prohibited Animal Crossing bells and items or anything like that. It literally uses the same mechanic that jumps over holes and rivers. Anyway, we’ll be discussing this amazing-looking waterfall entrance that leads to a secret zen-like hidden garden and you can of course only access it by jumping through the waterfall. There are many uses for an area like this you could create a hidden forest full of mushrooms, and trees or a secret hidden library full of books, which would be an awesome place to relax. Or even just a safe place for those valuable items you want to keep hidden from your friends. It will make much more sense as we go we are sure you’ll have way better ideas than mean.
- Location
To start, you don’t want a fairly sizable open area to work with, that isn’t on the highest level. This is because you want to build within the cliffs and have some space to add cliffs around the edges of the hidden area on the next layer up. This helps to hide the area from the outside. Of course, there is literally no limit on how big your secret area could be. You could have a tiny little area only a few tiles wide or you could create a large open area and build out an entire landscape, really it’s a personal preference.
The location isn’t too important either, but the first step is to decide what works best for your island by choosing where you want the hidden area to go and how much ground you want to cover. You can go with approximately 9 tiles wide for the hidden area cell on the inside of the cliffs, and we do recommend going slightly bigger though as you want to get a whole bunch of cool items which are crafted with DIY Recipes or buy with ACNH Nook Miles Tickets inside your secret area once it’s finished. Once we find a nice location is simply a case of clearing it and digging out the rough footprint, if you’re starting from flat ground you’re probably going to want to build up the cliffs around the back and sides of the area too. It doesn’t really matter if you get the cliffs exactly right at this point as they can always be changed later
- Decorate Cliffs
If you’ve opted to hide your secret area within the cliffs towards the back of the map, you’re going to want to decorate the edges of the cliffs which helps to hide what’s going on from an outside perspective. As already mentioned, it’s best if you have the top cliffs all the way around the back and sides of the hidden area, which will not only stop people from gaining access to the area but also stop people from seeing in and help to disguise it. With cliffs, it leaves a one tile gap which we need to fill with either bushes, fences or ACNH furniture or things like that. You can choose the head if it’s your favorite fence type, but we think bushes would look cool too if you don’t mind waiting for them to grow.
Anyway fill in the gap between the cliff and the hidden area, so people can’t walk around the outside you’re basically creating an enclosure. Once that’s done, we’re almost there, to be honest as you can see, we have a nice cutout in the cliff surrounded by a hedge that stops people from accessing it, surrounded by other cliffs which really helps hide it from view.
- Build Waterfalls
Cliff the main area dugout is time to build the actual waterfalls, which will eventually be the entrance to the secret area. Here we need to fill in the cliffs along the front which will close off the hidden area. This needs to be exactly two tiles wide, any wider and you won’t be able to jump through the waterfall. Once you’re happy with the size of your area and the front has been closed off it should be pretty difficult to get in and that’s what we won. Next is to position the waterfalls, you can go for three one tile wild waterfalls but really you only need the one in the center with space on either side. While we’re here we can also landscape a bit of the entrance to make it look a bit fancy but digging out some ponds all the waterfalls that we’re not going to be using.
Now, this is the important step that allows you to actually jump through the waterfall. You need to head inside the secret area and dig out some tiles of water to create a checkerboard-like pattern matching the waterfalls around the front. Placing these together like this is the key to being able to jump through. Once those are in place you can get out again make sure you’ve got everything correct and try it out and just like that you should be able to jump through the waterfall just by walking up to it.
- Decorate Area
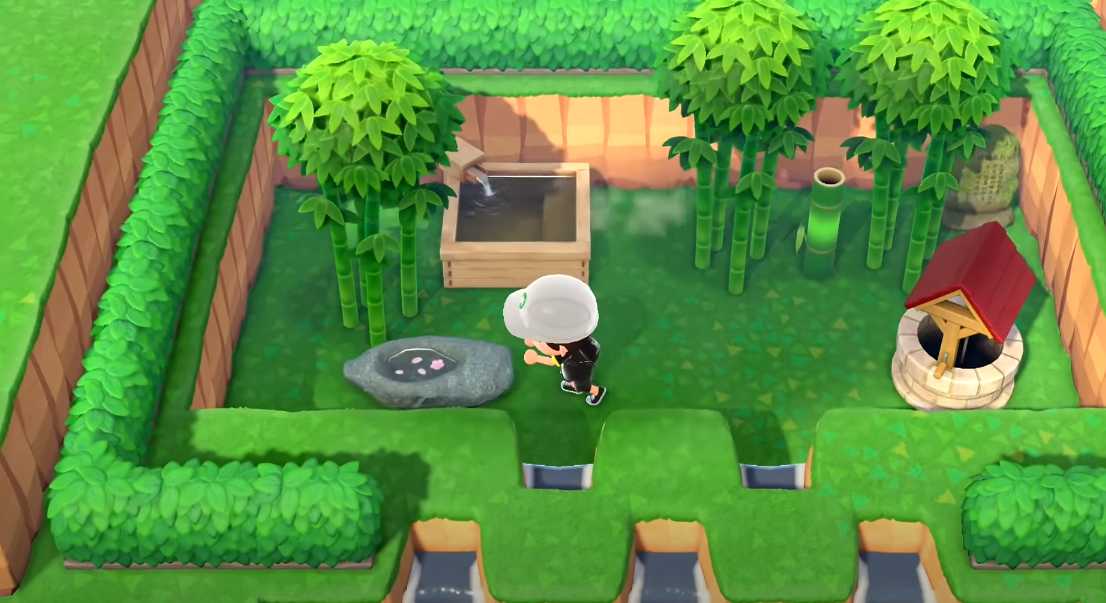
Now that the secret area is pretty much finished and only accessible by the waterfall entrance, you’re going to want to tidy up the surrounding area. For me, I just needed to fill out the remaining cliffs along the top layer to help hide the area even more. Then is decoration time, I chose to create a nice zen-like garden which will act as a nice little escape on my island. I planted some bamboo trees and placed a bath and some other furniture inside to make a nice and relaxing environment. But you can do whatever you like here obviously.
That’s pretty much it you should now have a nice secret area with a waterfall entrance hidden away somewhere on your island.

Unleashing the Power of the Office Accelerator: Maximizing Productivity and Efficiency in the Workplace with Office 365 Accelerator

Unlocking the Hidden Potential of Your Website: Strategies for Growth

From AI to VR: How Cutting-Edge Tech Is Reshaping Personal Injury Law in Chicago
 Microsoft4 years ago
Microsoft Office 2016 Torrent With Product Keys (Free Download)
 Torrent4 years ago
Les 15 Meilleurs Sites De Téléchargement Direct De Films 2020

 Money4 years ago
25 Ways To Make Money Online

 Torrent4 years ago
FL Studio 12 Crack Télécharger la version complète fissurée 2020

 Education3 years ago
Significado Dos Emojis Usado no WhatsApp

 Technology4 years ago
Avantages d’acheter FL Studio 12

 Technology4 years ago
DESKRIPSI DAN MANFAAT KURSUS PELATIHAN COREL DRAW
 Education3 years ago
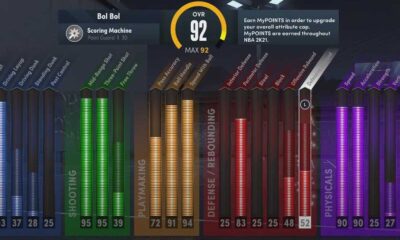
Best Steph Curry NBA 2K21 Build – How To Make Attribute, Badges and Animation On Steph Curry Build 2K21
You must be logged in to post a comment Login